Android Programming and development
Installing the Software
•Java 6
•Eclipse
•Android SDK base
•Eclipse ADT Plugin
•Updated SDK components
•AVD (Android Virtual Device).
Java SE 6
•Use
Java 6 (aka JDK 1.6)
–Java 5 supported only by older Android
versions
–Java 7 can technically be used, but new
Java 7 features not supported
•For
Windows \ Linux, follow directions at http://adf.ly/aA0I0
–Get JDK,
not just JRE
–Get SE
(Standard Edition), not EE nor ME editions
–Don’t get version with the Net Beans
IDE
Eclipse
–Eclipse
is a free open source IDE (Integrated Development Environment). Support for
Java, HTML, CSS, JavaScript, C++, PHP, and more.
–Google
has free Eclipse plugin to integrate with the Android SDK.
•Features
–General
•Checks your syntax as you type
•Automatically compiles every time you
save file
•Refactoring, debugging, templates for
common tasks, etc.
–Android-specific
•Deploy apps to Android emulator
•Configure virtual environments
•Configure virtual environments
• use “for Java”
– Latest version
(3.7 –INDIGO ) recommended.
– No installer, just Unzip the downloaded
file
The Android SDK
• Overview
–Android-specific libraries
–Dalvik (Android
Virtual Machine) compiler
–Android emulator (to run without physical
device)
–DDMS (Dalvik Debug Monitor Server
)
debugging environment
The Android SDK Documentation
• Installation
• Developer’s
Guide
• JavaDoc(API
Reference)
• Tutorials
and articles
• Download and run installer
– From http://developer.android.com/sdk/
•E.g. install in C:\android-sdk
– Sets up basic SDK, but omits many
components
•Detailed instructions
•Postponed step
–After installing Eclipse plugin, we will
run the Android SDK Manager to get
important missing components
•Easiest to do from Eclipse. See upcoming
slide after Eclipse ADT installation.
Eclipse ADT Plugin
•Overview
–ADT
(Android Development Tools) provides many useful features accessible directly
in Eclipse
•Integration
between Eclipse & Android command-line tools
•Drag-and-drop GUI builder
•Many development and debugging aids
•Detailed
installation instructions
•More
details
Installing Eclipse ADT
•Steps
–Start Eclipse


–Help – Install New Software …
–Click “Add” in upper-right
–In Add Repository, for Name
enter “ADT Plugin” and
for
• Steps …
–Click OK, select checkbox next to
Developer Tools,
Next, see packages to be installed
–Accept license, Finish.
•Restart Eclipse if asked.
–Run Android SDK Manager
•Should be prompted; if not, Windows -
Android SDK Manager
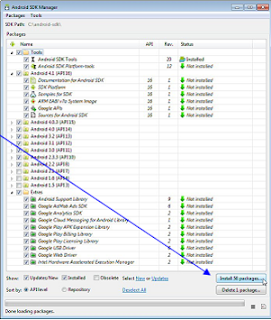
Updating SDK Components
•Run Android SDK manager
–Window
- Android SDK Manager
•Probably
prompted automatically after installing ADT plugin and restarting Eclipse
–Select
all entries, except that you can omit Android versions older than 2.2
•Click
“Install n packages”
•Runs
for a longtime

•Detailed
instructions
Android Virtual Devices (AVDs)
•An
AVD (Android Virtual Device) is an
Android Emulator configuration that lets
you model an actual device by defining hardware and software options.
•Idea
–Define
several AVDs at different Android API levels to test against.
–At
least two:
•Newest
version (e.g., 4.1 –Jelly Bean)
•Most
common version (2.3.3 as of 2012)
•To
see statistics for versions of currently used Android devices, see
•Detailed
instructions
Defining an AVD
•Defining
–Window
-> AVD
Manager
–Click
on
“New” at top. Choose name (arbitrary) and options.
You can (should!) create multiple AVDs.
•Options
 –Target
(i.e.,
target API version)
–Target
(i.e.,
target API version)
•4.1
to
test tablet and new features
•2.3.3
to
test most common phones
–SD
Card
size
•Can
be
omitted. Or, choose middle
of
the
road value, e.g., 4 GB
–Skin
•Use
default
for the target you chose
Configuring Eclipse ADT
•Set SDK Location
–Window –> Preferences
->
Android -> Click Browse and point at place you installed
the SDK

–Optional:
disable sending stats to Google
•Window
-> Preferences
->
Android
->
Usage
Stats
Running Apps
•Ways to run
–On the Android Emulator. Deploy
directly from Eclipse.
•During development,
do your normal testing here
–On an Android device. Deploy from your
PC via USB.
•Other
options
covered online
–On an Android device. Deploy from a
Web site.
–On an Android device. Deploy via
email.
–On and Android device. Deploy from the
Android Market
Running Apps on Android
Emulator


0 التعليقات:
Post a Comment